使用uiautomator的python封装进行android的UI测试
最近项目中有个需求要在至少100台手机上对应用进行兼容性测试,首先想到的就是自动化来操作,不想一台台的操作相同的重复操作
基本的需求是这样的,安装被测试的应用,启动并退出,然后安装测试样本,检测是否有相应的弹窗拦截
考虑到市面上的各种测试框架与自已熟悉的编程语言,最后选择了google自家的uiautomator来搞,借助于前人对其进行了python封装,所以一开始还是挺顺利的,但是整个过程中还是有很多需要注意的地方
https://github.com/xiaocong/uiautomator 这个是xiaocong对其进行的python封装,也是这个小测试用例使用的,膜拜下
python27,不能使用python26,安装urllib3与uiautomator,可以使用easy_install命令,安装android SDK,配置好adb的环境变量,这些应该都是作为android测试人员最基本的环境配置,要测试的应用是360手机急救箱,可以从http://jijiu.360.cn/ 这个网址下载
下面是基本的测试流程
# 需要配置好adb 环境变量
# 1.先确定有几台手机
# 2.再确定有多少个应用
# 3.先安装mkiller,启动mkiller
# 4.再安装测试的样本
# 5.检查是否有取消安装的按钮出现,出现说明测试通过,没出现说明测试失败
既然要采用自动化,就不能手机测试那样,一台一台的跑,应该可以同时跑多台手机,我的想法就是启用多线程来跑,每个手机用一个线程来跑
确定有几台手机
我封了一个方法
def finddevices():
    rst = util.exccmd('adb devices')
    devices = re.findall(r'(.*?)\s+device',rst)
    if len(devices) >1:
        deviceIds = devices[1:]
        logger.info('共找到%s个手机'%str(len(devices)-1))
        for i in deviceIds:
            logger.info('ID为%s'%i)
        return deviceIds
    else:
        logger.error('没有找到手机,请检查')
        return
uiautomator在python中的使用
下面来说说uiautomator在python中的使用,其实github中的readme.md写的挺清楚,但是实践起来还是有一些问题
uiautomator在使用的时候都要初始化一个d对象,单个手机可以通过
from uiautomator import device as d
多台手机可以
from uiautomator import Device
然后通过 d=Device(Serial)的方式初始化d对象,以后的操作基本上都是操作这个d对象,可以想象每个d对应着一台手机
我觉得这个设计有点不大好,我现在还经常在device的大小写上犯迷糊
基本的点击操作
# press home key
d.press.home()
# press back key
d.press.back()
# the normal way to press back key
d.press("back")
# press keycode 0x07('0') with META ALT(0x02) on
d.press(0x07, 0x02)
首先安装启动应用,安装采用adb install 命令,启动采用adb shell am start 命令
手机急救箱的launchable-activity是'com.qihoo.mkiller.ui.index.AppEnterActivity',第一次启动会弹出使用协议要用户来点击”同意并使用”
watcher的使用
我这里采用了watcher来监视并且点击,基本的watcher方法是
d.watcher('agree').when(text=u'同意并使用').click(text=u'同意并使用')
先给watcher起一个名字,随便起,我这里叫agree,when里面写条件,我这里就是当text为’同意并使用’,后面写当符合这些条件的时候进行的操作,我这里就是click(text=u'同意并使用'),这里有一个坑,我之前写watcher的时候,就直接写click() 我以为里面不写内容默认就会点击前面找到的元素,但是后来发现这样是不行的,必须要写上要点击哪个对象
其实对于这种只出现一次的view可以不用写在watcher里,可以直接写d(text=u'同意并使用').click(),但是考虑到这个界面出现之前会有一些延迟,各种手机的性能不同,也不好加time.sleep()时间,所以我建议像这种一律写到watcher里,什么时候出现就什么时候点击。
由于这个应用会请求root权限,所以有时第三方的root工具会弹相应的授权提示框,我想大部分的root工具应该都是有”允许”这个按钮的,于是我就加了一个watcher
d.watcher('allowroot').when(text=u'允许').click(text=u'允许')
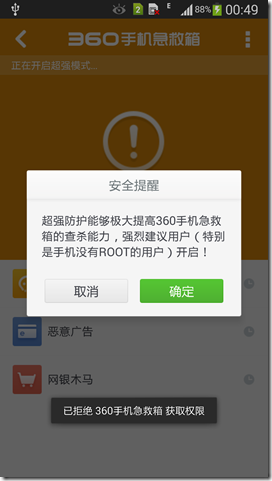
点击同意后会再弹一个开启超强模式的弹框,这里我要点击的是取消
d.watcher('cancel').when(text=u'取消').click(text=u'取消')
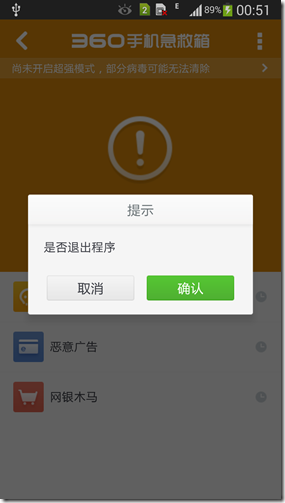
之后要点击一下back键,这时又会弹一个是否退出的框,这次我要点击“确认”
这个确认我是后面单独处理的,其实也可以放在watcher里,只是我的考虑是有时点击back键的时候不一定会弹出来这个框,所以我会尝试多点击几次,直到这个框出来
但现在就有一个问题了,刚才写了一个d.watcher('cancel').when(text=u'取消').click(text=u'取消'),这时当弹出这个框的时候,watcher就要起作用了,就会先去点击取消,这不是我想要的,所以我将之前点击取消的加了一个限制条件
d.watcher('cancel').when(text=u'取消').when(textContains=u'超强防护能够极大提高').click(text=u'取消')
textContains的意思就是和包含里面的文字,上面的意思就是当界面中text是“取消”的同时还要有一个view的text中要包含u'超强防护能够极大提高',这样的话就限制的点击“取消”的条件,再遇到退出时的提示框就不会再会点击”取消”了
尽可能的想到可能出现的弹框,比较在小米手机中安装应用会弹一个小米的安装确认界面,使用下面的watcher来进行监测点击
d.watcher('install').when(text=u'安装').when(textContains=u'是否要安装该应用程序').click(text=u'安装',className='android.widget.Button')
总的watcher就是下面的样子
d.watcher('allowroot').when(text=u'允许').click(text=u'允许')
        d.watcher('install').when(text=u'安装').when(textContains=u'是否要安装该应用程序').click(text=u'安装',className='android.widget.Button') #专门为小米弹出的安装拦截
        d.watcher('cancel').when(text=u'取消').when(textContains=u'超强防护能够极大提高').click(text=u'取消')
        d.watcher('confirm').when(text=u'确认').when(textContains=u'应用程序许可').click(text=u'确认')
        d.watcher('agree').when(text=u'同意并使用').click(text=u'同意并使用')
        d.watcher('weishiuninstall').when(textContains=u'暂不处理').click(textContains=u'暂不处理')
然后使用d.watchers.run()来启动watcher
但是在实际的watcher中,我发现这个watcher并没有想象的那样好用,有时经常是明明有相应的view但是就是点击不上,经过多次尝试,我发现,当界面已经出现的时候,这时我再强行的使用run()方法来启动watchers,这时它就能很好的点击了,所以基于此,我写了一个循环来来无限的调用run方法,times限制了次数,根据项目的实际进行调整吧,sleep时间也可以相应的调整
def runwatch(d,data):
    times = 120
    while True:
        if data == 1:
            return True
        # d.watchers.reset()
        d.watchers.run()
        times -= 1
        if times == 0:
            break
        else:
            time.sleep(0.5)
监视的时候又不能只跑监视程序,还要跑相应的测试步骤,所以这里我把这个runwatch方法放到一个线程中去跑,起一个线程用作监视,脚本的测试方法放在另外的线程上跑
线程函数
#线程函数
class FuncThread(threading.Thread):
    def __init__(self, func, *params, **paramMap):
        threading.Thread.__init__(self)
        self.func = func
        self.params = params
        self.paramMap = paramMap
        self.rst = None
        self.finished = False

    def run(self):
        self.rst = self.func(*self.params, **self.paramMap)
        self.finished = True

    def getResult(self):
        return self.rst

    def isFinished(self):
        return self.finished

def doInThread(func, *params, **paramMap):
    t_setDaemon = None
    if 't_setDaemon' in paramMap:
        t_setDaemon = paramMap['t_setDaemon']
        del paramMap['t_setDaemon']
    ft = FuncThread(func, *params, **paramMap)
    if t_setDaemon != None:
        ft.setDaemon(t_setDaemon)
    ft.start()
    return ft
所以这里启动线程来跑runwatcher的调用就是
data = 0
doInThread(runwatch,d,data,t_setDaemon=True)
多台手机的运行问题
基本的思路就是这样,这样当脚本都写完了以后在单个手机上运行很好,但是一旦插入多个手机就会出现一个问题,所有watcher只在一台手机上有效,另外的手机就只能傻傻的不知道点击,这个问题困扰了很久,我在github上也给作者发issue,但是后来我自已找到了解决的办法,就是在d=Device(Serial)的时候加上local_port端口号,让每台手机使用不同的local_port端口号,这样各自运行各自的,都很完好
最终的代码
以下了测试脚本的代码
mkiller.py,主测试脚本文件
#coding:gbk

import os,sys,time,re,csv
import log
import util
from uiautomator import Device
import traceback
import log,logging
import multiprocessing

optpath = os.getcwd()                      #获取当前操作目录
imgpath = os.path.join(optpath,'img')      #截图目录

def cleanEnv():
    os.system('adb kill-server')
    needClean = ['log.log','img','rst']
    pwd = os.getcwd()
    for i in needClean:
        delpath = os.path.join(pwd,i)
        if os.path.isfile(delpath):
            cmd = 'del /f/s/q "%s"'% delpath
            os.system(cmd)
        elif os.path.isdir(delpath):
            cmd = 'rd /s/q "%s"' %delpath
            os.system(cmd)
    if not os.path.isdir('rst'):
        os.mkdir('rst')

def runwatch(d,data):
    times = 120
    while True:
        if data == 1:
            return True
        # d.watchers.reset()
        d.watchers.run()
        times -= 1
        if times == 0:
            break
        else:
            time.sleep(0.5)

def installapk(apklist,d,device):
    sucapp = []
    errapp = []
    # d = Device(device)
    #初始化一个结果文件
    d.screen.on()
    rstlogger = log.Logger('rst/%s.log'%device,clevel = logging.DEBUG,Flevel = logging.INFO)
    #先安装mkiller
    mkillerpath = os.path.join(os.getcwd(),'MKiller_1001.apk')
    cmd = 'adb -s %s install -r %s'% (device,mkillerpath)
    util.exccmd(cmd)
    def checkcancel(d,sucapp,errapp):
        times = 10
        while(times):
            if d(textContains = u'取消安装').count:
                print d(textContains = u'取消安装',className='android.widget.Button').info['text']
                d(textContains = u'取消安装',className='android.widget.Button').click()
                rstlogger.info(device+'测试成功,有弹出取消安装对话框')
                break
            else:
                time.sleep(1)
                times -= 1
                if times == 0:
                    rstlogger.error(device+'测试失败,没有弹出取消安装对话框')
    try:
        d.watcher('allowroot').when(text=u'允许').click(text=u'允许')
        d.watcher('install').when(text=u'安装').when(textContains=u'是否要安装该应用程序').click(text=u'安装',className='android.widget.Button') #专门为小米弹出的安装拦截
        d.watcher('cancel').when(text=u'取消').when(textContains=u'超强防护能够极大提高').click(text=u'取消')
        d.watcher('confirm').when(text=u'确认').when(textContains=u'应用程序许可').click(text=u'确认')
        d.watcher('agree').when(text=u'同意并使用').click(text=u'同意并使用')
        d.watcher('weishiuninstall').when(textContains=u'暂不处理').click(textContains=u'暂不处理')
        # d.watchers.run()
        data = 0
        util.doInThread(runwatch,d,data,t_setDaemon=True)
        #启动急救箱并退出急救箱
        cmd = 'adb -s %s shell am start com.qihoo.mkiller/com.qihoo.mkiller.ui.index.AppEnterActivity'% device
        util.exccmd(cmd)
        time.sleep(5)
        times = 3
        while(times):
            d.press.back()
            if d(text=u'确认').count:
                d(text=u'确认').click()
                break
            else:
                time.sleep(1)
                times -=1

        for item in apklist:
            apkpath = item
            if not os.path.exists(apkpath):
                logger.error('%s的应用不存在,请检查'%apkpath)
                continue
            if not device:
                cmd = 'adb install -r "%s"' % apkpath
            else:
                cmd = 'adb -s %s install -r "%s"'%(device,apkpath)
            util.doInThread(checkcancel,d,sucapp,errapp)
            rst = util.exccmd(cmd)
    except Exception, e:
        logger.error(traceback.format_exc())
        data = 1
    data = 1
    return sucapp

def finddevices():
    rst = util.exccmd('adb devices')
    devices = re.findall(r'(.*?)\s+device',rst)
    if len(devices) >1:
        deviceIds = devices[1:]
        logger.info('共找到%s个手机'%str(len(devices)-1))
        for i in deviceIds:
            logger.info('ID为%s'%i)
        return deviceIds
    else:
        logger.error('没有找到手机,请检查')
        return

#needcount:需要安装的apk数量,默认为0,既安所有
#deviceids:手机的列表
#apklist:apk应用程序的列表
def doInstall(deviceids,apklist):
    count = len(deviceids)
    port_list = range(5555,5555+count)
    for i in range(len(deviceids)):
        d = Device(deviceids[i],port_list[i])
        util.doInThread(installapk,apklist,d,deviceids[i])

#结束应用
def uninstall(deviceid,packname,timeout=20):
    cmd = 'adb -s %s uninstall %s' %(deviceid,packname)
    ft = util.doInThread(os.system,cmd,t_setDaemon=True)
    while True:
        if ft.isFinished():
            return True
        else:
            time.sleep(1)
            timeout -= 1
            if timeout == 0:
                return False

# 需要配置好adb 环境变量
# 1.先确定有几台手机
# 2.再确定有多少个应用
# 3.先安装mkiller,启动mkiller
# 4.再安装测试的样本
# 5.检查是否有取消安装的按钮出现,出现说明测试通过,没出现说明测试失败

if __name__ == "__main__":
    cleanEnv()
    logger = util.logger
    devicelist = finddevices()
    if devicelist:
        apkpath = os.path.join(os.getcwd(),'apk')
        apklist = util.listFile(apkpath)
        doInstall(devicelist,apklist) #每个手机都要安装apklist里的apk
util.py 线程与执行cmd脚本函数文件
#coding:gbk
import os,sys
import log
import logging
import threading
import multiprocessing
import time

logger = log.Logger('log.log',clevel = logging.DEBUG,Flevel = logging.INFO)

def exccmd(cmd):
    try:
        return os.popen(cmd).read()
    except Exception:
        return None

#遍历目录内的文件列表
def listFile(path, isDeep=True):
    _list = []
    if isDeep:
        try:
            for root, dirs, files in os.walk(path):
                for fl in files:
                    _list.append('%s\%s' % (root, fl))
        except:
            pass
    else:
        for fn in glob.glob( path + os.sep + '*' ):
            if not os.path.isdir(fn):
                _list.append('%s' % path + os.sep + fn[fn.rfind('\\')+1:])
    return _list

#线程函数
class FuncThread(threading.Thread):
    def __init__(self, func, *params, **paramMap):
        threading.Thread.__init__(self)
        self.func = func
        self.params = params
        self.paramMap = paramMap
        self.rst = None
        self.finished = False

    def run(self):
        self.rst = self.func(*self.params, **self.paramMap)
        self.finished = True

    def getResult(self):
        return self.rst

    def isFinished(self):
        return self.finished

def doInThread(func, *params, **paramMap):
    t_setDaemon = None
    if 't_setDaemon' in paramMap:
        t_setDaemon = paramMap['t_setDaemon']
        del paramMap['t_setDaemon']
    ft = FuncThread(func, *params, **paramMap)
    if t_setDaemon != None:
        ft.setDaemon(t_setDaemon)
    ft.start()
    return ft
log.py log相应的函数文件
#coding=gbk
import logging,os
import ctypes

FOREGROUND_WHITE = 0x0007
FOREGROUND_BLUE = 0x01 # text color contains blue.
FOREGROUND_GREEN= 0x02 # text color contains green.
FOREGROUND_RED  = 0x04 # text color contains red.
FOREGROUND_YELLOW = FOREGROUND_RED | FOREGROUND_GREEN

STD_OUTPUT_HANDLE= -11
std_out_handle = ctypes.windll.kernel32.GetStdHandle(STD_OUTPUT_HANDLE)
def set_color(color, handle=std_out_handle):
    bool = ctypes.windll.kernel32.SetConsoleTextAttribute(handle, color)
    return bool

class Logger:
    def __init__(self, path,clevel = logging.DEBUG,Flevel = logging.DEBUG):
        self.logger = logging.getLogger(path)
        self.logger.setLevel(logging.DEBUG)
        fmt = logging.Formatter('[%(asctime)s] [%(levelname)s] %(message)s', '%Y-%m-%d %H:%M:%S')
        #设置CMD日志
        sh = logging.StreamHandler()
        sh.setFormatter(fmt)
        sh.setLevel(clevel)
        #设置文件日志
        fh = logging.FileHandler(path)
        fh.setFormatter(fmt)
        fh.setLevel(Flevel)
        self.logger.addHandler(sh)
        self.logger.addHandler(fh)

    def debug(self,message):
        self.logger.debug(message)

    def info(self,message):
        self.logger.info(message)

    def war(self,message,color=FOREGROUND_YELLOW):
        set_color(color)
        self.logger.warn(message)
        set_color(FOREGROUND_WHITE)

    def error(self,message,color=FOREGROUND_RED):
        set_color(color)
        self.logger.error(message)
        set_color(FOREGROUND_WHITE)

    def cri(self,message):
        self.logger.critical(message)

if __name__ =='__main__':
    logyyx = Logger('yyx.log',logging.WARNING,logging.DEBUG)
    logyyx.debug('一个debug信息')
    logyyx.info('一个info信息')
    logyyx.war('一个warning信息')
    logyyx.error('一个error信息')
    logyyx.cri('一个致命critical信息')
这个小测试应用虽然比较简单,但是由于刚刚接触uiautomator的python封装,所以还是遇到了一些麻烦,不过还好,最终的结果是很好的解决了相应的问题,这里也算是抛砖引玉吧,这个uiautomator还有很多好玩的值得探索的地方,待以后慢慢发现~


