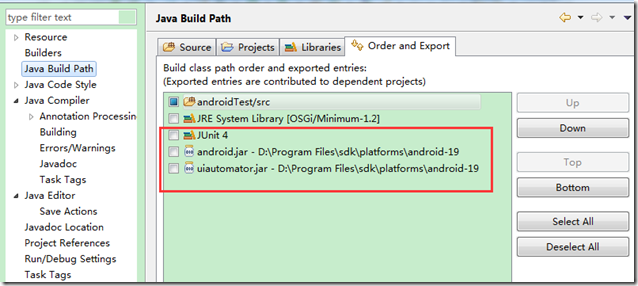
packagecom;importcom.android.uiautomator.core.UiObject;importcom.android.uiautomator.core.UiObjectNotFoundException;importcom.android.uiautomator.core.UiScrollable;importcom.android.uiautomator.core.UiSelector;importcom.android.uiautomator.testrunner.UiAutomatorTestCase;publicclassRunerextendsUiAutomatorTestCase{publicvoidtestDemo()throwsUiObjectNotFoundException{// Simulate a short press on the HOME button.getUiDevice().pressHome();// We’re now in the home screen. Next, we want to simulate// a user bringing up the All Apps screen.// If you use the uiautomatorviewer tool to capture a snapshot// of the Home screen, notice that the All Apps button’s// content-description property has the value “Apps”. We can// use this property to create a UiSelector to find the button.UiObjectallAppsButton=newUiObject(newUiSelector().description("Apps"));// Simulate a click to bring up the All Apps screen.allAppsButton.clickAndWaitForNewWindow();// In the All Apps screen, the Settings app is located in// the Apps tab. To simulate the user bringing up the Apps tab,// we create a UiSelector to find a tab with the text// label “Apps”.UiObjectappsTab=newUiObject(newUiSelector().text("Apps"));// Simulate a click to enter the Apps tab.appsTab.click();// Next, in the apps tabs, we can simulate a user swiping until// they come to the Settings app icon. Since the container view// is scrollable, we can use a UiScrollable object.UiScrollableappViews=newUiScrollable(newUiSelector().scrollable(true));// Set the swiping mode to horizontal (the default is vertical)appViews.setAsHorizontalList();// Create a UiSelector to find the Settings app and simulate// a user click to launch the app.UiObjectsettingsApp=appViews.getChildByText(newUiSelector().className(android.widget.TextView.class.getName()),"Settings");settingsApp.clickAndWaitForNewWindow();// Validate that the package name is the expected oneUiObjectsettingsValidation=newUiObject(newUiSelector().packageName("com.android.settings"));assertTrue("Unable to detect Settings",settingsValidation.exists());UiObjectreportBug=newUiObject(newUiSelector().text("Sound"));reportBug.clickAndWaitForNewWindow();UiObjectsoundValidation=newUiObject(newUiSelector().text("Volumes"));assertTrue("Unable to detect Sound",soundValidation.exists());getUiDevice().pressHome();}
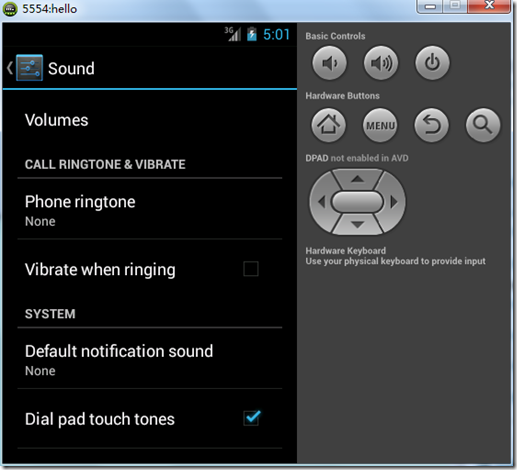
UiObjectreportBug=newUiObject(newUiSelector().text("Sound"));reportBug.clickAndWaitForNewWindow();UiObjectsoundValidation=newUiObject(newUiSelector().text("Volumes"));assertTrue("Unable to detect Sound",soundValidation.exists());